Leadfeeder's system consists of multiple applications, mainly written in Ruby. We want to be sure that each of these components works as expected, so we cover the code with unit tests and, in the case of Rails applications, with controller specs.
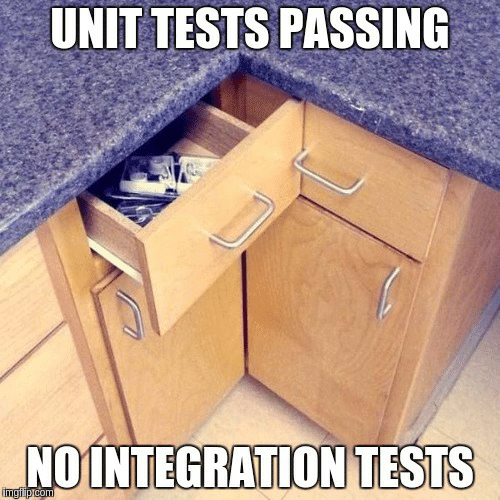
However, sometimes having a good unit test coverage might be not enough and still may lead to the classical "2 unit tests, 0 integration tests" situation like the one in the meme below:
To prevent such situations, in case of more critical parts of the system we write UI tests that cover the whole functionality from top to bottom.
One of the major problems that we have to deal with is that our apps can be visited from potentially any device/browser. Even though the developers of browsers try to stick to the standards each of the browsers behaves slightly differently.
Oh, and there's Internet Explorer too...
As you can probably imagine we're not running manual tests on all browsers available on the market. What we did instead is we've developed our own testing toolkit that runs a suite of tests on a set of real devices on the CrossBrowserTesting platform.
In this post, I'd like to show you step by step how we integrated all the moving parts in order to create such a toolkit — Hopefully, you'll be able to set up something similar in your own projects too.
When you're done with reading this article you can find the whole code in this repository.
Note: Try Leadfeeder for 14-days, free. You read that correctly, free leads for two weeks.
Step 0 - Prepare the application under test
Let's prepare a simple Rails 6.1 application called LinkShortener. Its only purpose will be creating short links out of URLs provided by users. Something similar to what bit.ly does.
The app will neither be beautiful (I'll use default views produced by Rails generators) nor user-friendly, but it should be enough to be able to write a simple UI test suite.
The application consists of four endpoints:
get "/short_links/new"- Shows a form for creating a new short linkpost "/short_links"- Saves a new short link in the databaseget "/short_links/:id"- Displays information about a linkget "/l/:slug"- Redirects user to the original URL stored in the ShortLink record.
Go ahead - check out the repository locally and try the app out by running rails server and visiting localhost:3000.
Step 1 - Setup RSpec and Capybara
Before testing the app with real browsers on crossbrowsertesting.com let's start small and write a simple RSpec test suite that will be executed by Capybara using Chrome driver (make sure you have Chrome browser installed beforehand).
First, let's add necessary gems to Gemfile:
group :test do
  gem 'capybara', '>= 3.26'
  # Easy installation and use of web drivers to run system tests with browsers
  gem 'webdrivers'
  gem 'rspec-rails'
endspec/spec_helper.rb and spec/capybara_helper.rb files that'll configure RSpec and Capybara respectively. I've removed most of the typical "boilerplate" code from the listings below to make this post easier to read. You can still find the full code in the repository.
spec_helper.rb:
require "capybara_helper"

RSpec.configure do |config|
  # ... Typical boilerplate
end
capybara_helper.rb:
require "capybara"
require "capybara/rspec"

# Run the app on localhost:7654
Capybara.server_host = "localhost"
Capybara.server_port = 7654

# Use puma server for running Capybara
Capybara.server = :puma

# Use Chrome driver for interacting with the application
Capybara.default_driver = :selenium_chromespec/features/links_spec.rb. The first spec will verify that creating and redirecting works correctly. The other one will test the unhappy path when trying to save a short link by pointing to an invalid URL.
# frozen_string_literal: true

require "rails_helper"

RSpec.feature "Creating short links and using them for redirection" do
  context "when providing valid URL to redirect" do
    it "creates a new link and allows using it for redirection" do
      visit("/")

      original_url = "https://www.google.com/"
      fill_in("Original url", with: original_url)

      click_on("Create Short link")

      expect(page).to have_text("Short link was successfully created.")
      expect(page).to have_text("Original url: #{original_url}")

      short_link = find("#short_link")
      expect(short_link.text).to have_text(/http.+\/l\/\w{8}/)

      short_link.click

      expect(page.current_url).to eq(original_url)
    end
  end

  context "when providing an invalid URL to redirect" do
    it "renders errors" do
      visit("/")

      fill_in("Original url", with: "bad url")

      click_on("Create Short link")

      expect(page).to have_text("Original url must be a valid URL")
    end
  end
end
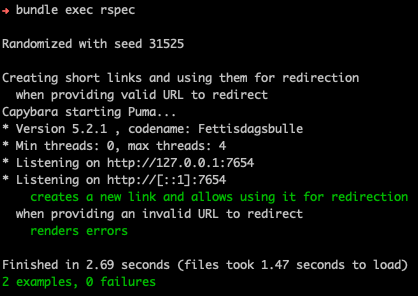
Let's now run our test suite by calling $ bundle exec rspec . Here's how the output should look:
Step 2 - Using ngrok tunnels
Great, we have a working Capybara setup and a passing test suite. Many people would stop here, but not us! Eventually, we'd like CrossBrowserTesting's browsers to run our tests, so we'll have to somehow allow their computers to access the LinkShortener app.
CrossBrowserTesting's help docs suggest using SmartBear SecureTunnel CLI that sets up an HTTP tunnel between their servers and your computer. I've tried using it and I have to say it was rather a poor experience... Many times the tests would fail due to connection errors. Also, some CBT (mostly Mac/iOS) devices couldn't access localhost:7654 and I had to access the application by calling local:7654. Luckily we aren't stuck with the CLI suggested by crossbrowsertesting.com, because ngrok comes to the rescue!
If you don't yet know ngrok - it's a tool that allows setting up an HTTP(s) tunnel to the desired port on your computer. Once you run it, you receive HTTP and HTTPS URLs that route traffic from the Internet to your localhost.
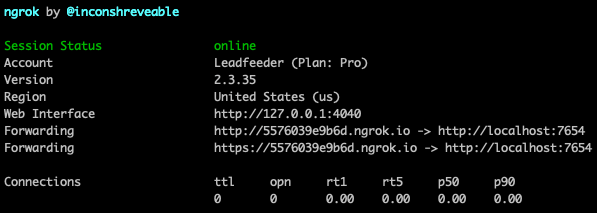
Try it out yourself by running $ ngrok HTTP 7654 . As you can see it creates two URLs pointing to localhost:7654. Don't be scared about our "Pro" plan - the features that we need in this tutorial are available in the free tier as well. :)
Now we'll configure RSpec to set up such a tunnel before each test and tell Capybara to access test pages through the URLs provided by ngrok. We'll do it by using ngrok-tunnel - a gem that wraps ngrok's CLI.
Add gem "ngrok-tunnel" to the Gemfile and make sure that you have ngrok installed in a folder listed in your $PATH variable. Otherwise, ngrok-tunnel won't be able to access ngrok binary and create tunnels.
Later create a new file: spec/ngrok_helper.rb with the following content:
require "ngrok/tunnel"

RSpec.configure do |config|
  # Tells capybara to access the server via an ngrok tunnel.
  original_app_host = Capybara.app_host
  config.around(:each) do |example|
    raise "Capybara.server_port is undefined" unless Capybara.server_port

    unless Ngrok::Tunnel.running?
      Ngrok::Tunnel.start(port: Capybara.server_port, authtoken: ENV["NGROK_AUTHTOKEN"])
    end

    Capybara.app_host = Ngrok::Tunnel.ngrok_url_https

    example.run

    Capybara.app_host = original_app_host
  end

  # If `NGROK_AUTHTOKEN` isn't provided then a new tunnel will be started with each
  # test to overcome free ngrok version limitations (40 connections per minute).
  config.after(ENV["NGROK_AUTHTOKEN"] ? :suite : :each) { Ngrok::Tunnel.stop }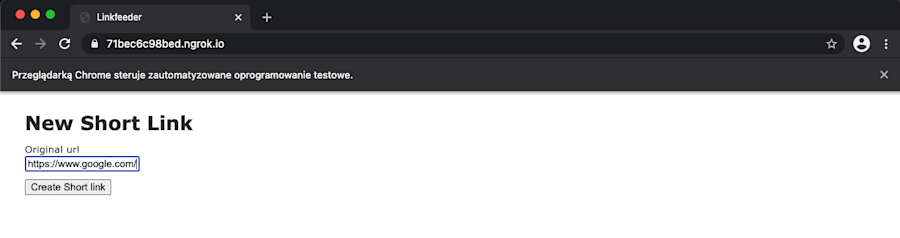
endspec_helper.rb by adding require_relative "ngrok_helper" and run bundle exec rspec. You should notice that the browser now visits URLs from ngrok.io domain instead of localhost:
Note: Normally when you run tests a new tunnel will be started before each spec to overcome the 40 connections per minute limit. However, if you have a paid ngrok account you can run specs with the NGROK_AUTHTOKEN variable.
That will keep a single tunnel running during the whole test suite and will save you precious seconds.
Step 3 - Test on real browsers using crossbrowsertesting.com
After all the previous work we're finally ready to integrate our test suite with CrossBrowserTesting platform. If you don't have an account there go ahead and create one. You can register for a trial here.
We'll create yet another helper file called spec/cbt_helper.rb that'll add a custom Selenium remote driver. The driver's URL will point to your CrossBrowserTesting account's testing hub.
In this example, it'll use Firefox browser on macOS, but later I'll show you how to run tests on any available device.
cbt_username = ENV["CBT_USERNAME"]
cbt_authkey = ENV["CBT_AUTHKEY"]

Capybara.register_driver :selenium_cbt do |app|
  caps = Selenium::WebDriver::Remote::Capabilities.new

  caps["name"] = "Custom build"

  caps["record_video"] = "true"
  caps["record_network"] = "true"
  caps["nativeEvents"] = "true"
  caps["javascriptEnabled"] = "true"

  cbt_url = "http://#{cbt_username}:#{cbt_authkey}@hub.crossbrowsertesting.com/wd/hub"

  caps['browserName'] = 'Firefox'
  caps['platform'] = 'Mac OSX 10.12'

  Capybara::Selenium::Driver.new(
    app,
    browser: :remote,
    url: cbt_url,
    desired_capabilities: caps
  )
end

Capybara.default_driver = :selenium_cbt
Add a require for this file in spec_helper.rb as well after creating it.
Running the tests will require two additional ENV variables:
CBT_USERNAME- Your CrossBrowserTesting email (make sure to replace @ with %40)CBT_AUTHKEY- Your CrossBrowserTesting key. You can find it in your settings.
Once you run CBT_USERNAME=<YOUR_EMAIL> CBT_AUTHKEY=<YOUR_AUTHKEY> bundle exec rspec CrossBrowserTesting will start a machine with Firefox and start clicking through your page.
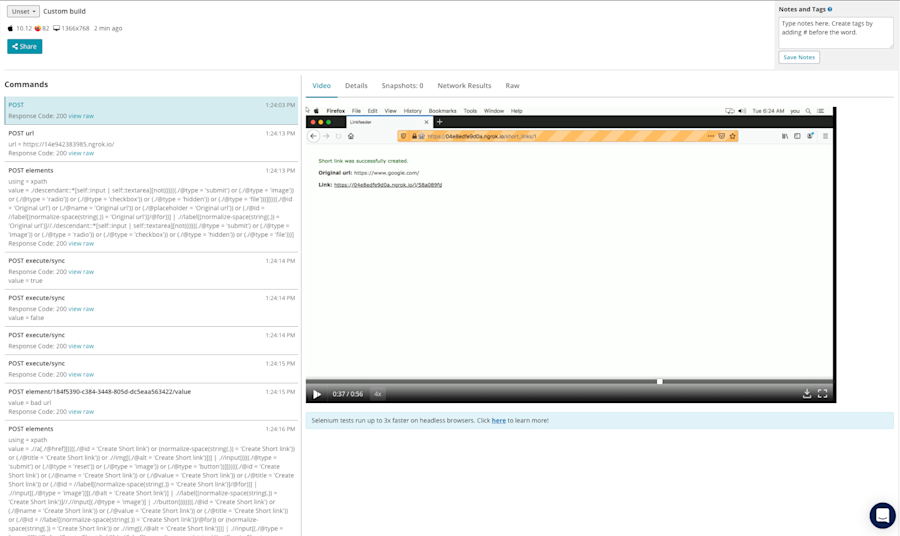
When rspec command finishes, go to https://app.crossbrowsertesting.com/selenium/results. There you can see the recording of your test and a list of all commands executed by the remote Selenium driver:
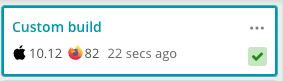
How to set CrossBrowserTesting build status?
We've reached our main goal - we've successfully run a test suite on a remote browser. However, as you probably noticed, all finished builds on crossbrowsertesting.com have "Unset" status which makes it a bit hard to spot a failing build.
Fortunately fixing this is really simple. All we need to do is send one HTTP PUT request to CrossBrowserTesting API with the result of RSpec test suite in after(:suite) hook.
We'll send the request using rest-client gem. After adding it to the Gemfile append the following snippet to cbt_helper.rb:
RSpec.configure do |config|
  config.after(:suite) do
    begin
      session_id = Capybara.current_session.driver.browser.session_id
      any_failed = RSpec.world.filtered_examples.values.flatten.any? do |x|
        x.metadata[:execution_result].status == :failed
      end
      score = any_failed ? "fail" : "pass"

      require 'rest-client'

      RestClient.put(
        "https://#{cbt_username}:#{cbt_authkey}@crossbrowsertesting.com/api/v3/selenium/#{session_id}",
        "action=set_score&score=#{score}"
      )
    rescue StandardError => e
      puts "Error while tracking score: #{e}"
    end
  end
end
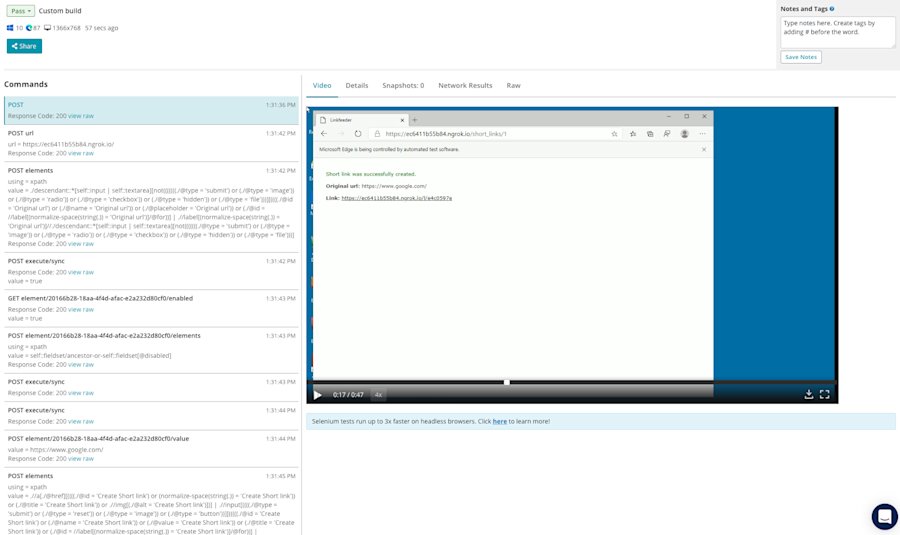
Run RSpec again now. Remote build status should now be set to "Pass":
How to test on other available devices/browsers?
And now a cherry on top - I'll show you how to run the test suite on any of the available CBT browsers.
As you may remember from the previous chapter we configured the remote Selenium driver to use Firefox browser on macOS by setting browserName = "Firefox" and platform = "Mac OSX 10.12" in desired_capabilities hash.
All we need to do in order to change the platform is to replace the current config with another one that matches the desired platform. But where can we get that info from? We can do it in two ways, let me show you both of them...
CrossBrowserTesting capabilities configurator
A simple way of changing the browser is picking a desired platform from the list available on https://app.crossbrowsertesting.com/selenium/run and just copying the generated snippet into cbt_helper.rb.
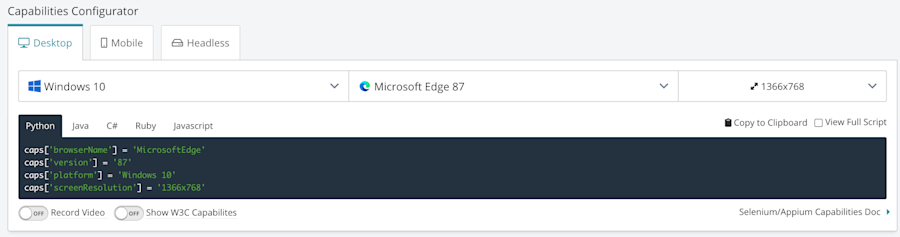
Once you pick e.g. Microsoft Edge from the list, replace the caps with the listed ones and run the specs you should see the following result:
CrossBrowserTesting API
Picking a browser from the Capabilities Configurator list may be enough in your case, but in our situation, it'd be great to be able to test the script on as many different devices as possible. Perfectly we'd run tests each time on a random browser.
The good news is that there's a simple way to do it. A full list of supported browsers can be loaded from CBT's API at https://crossbrowsertesting.com/api/v3/selenium/browsers.
Let's save the list from the API into spec/cbt_browsers.json, replace the Firefox config in cbt_helper.rb with the following snippet and run tests again.
platform = JSON.parse(File.read("spec/cbt_browsers.json")).sample
  browser = platform["browsers"].sample

  caps.merge!(platform["caps"])
  caps.merge!(browser["caps"])

  puts "Running CBT tests with caps: #{caps.inspect}"
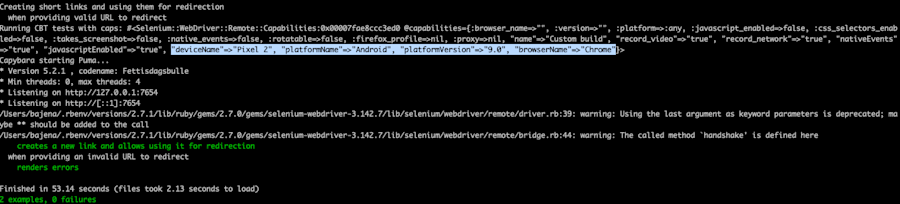
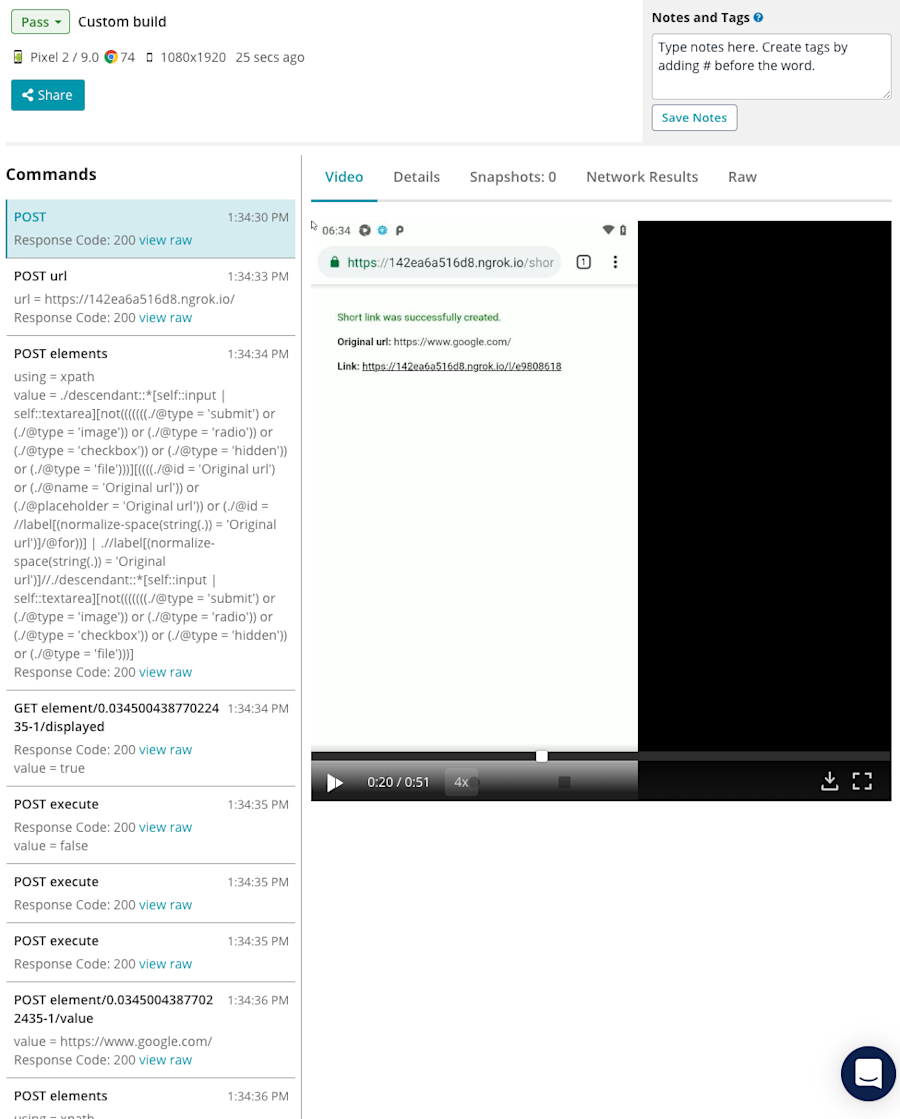
Our script picked a random device from the list and for the selected device it randomly chose a browser (in this case Pixel 2 with Chrome).
Conclusion
It took some work, but ultimately we managed to create a toolkit that can help us detect problems even on "exotic" device configurations. Having this framework you can e.g. configure a scheduled build in your CI tool that'll run the test suite every hour on a random browser.
I hope this tutorial will help you with making your code more bulletproof!
Note: Leadfeeder offers a 14-day free trial to identify companies that visit your website. Check it out.

I’m a programming enthusiast mostly interested in building backends using Ruby language and AWS cloud, but I don’t run away crying when I stumble upon CSS code. After hours I ride bikes and go for long walks with my dog. You can contact me through my LinkedIn profile.
Get more from your web analytics.
t’s time to turn your website traffic data numbers into something more meaningful. Website visitor analytics enable you to identify and qualify the companies visiting your website, even when they don’t fill out a form.
Show me how
